Nutrition Facts labels.
Documentation for designers.
FDA Nutrition Facts Label Generator for Adobe Illustrator. Eight official formats, fully editable vector artwork, generated in seconds. This is the complete user manual.
What is NutriFacts Max.
An Adobe Illustrator panel that generates FDA-compliant Nutrition Facts labels as fully editable vector artwork — directly in your document, ready for print.
NutriFacts Max replaces the manual workflow most packaging designers know by heart: building tables by hand, copy-pasting values from a spreadsheet, redrawing rules to match the FDA reference, and rebuilding the whole thing every time a client revises a single nutrient. Fill in your product data, choose your format, click Generate, and the label lands on its own layer in your active document.
What you get
- 8 official FDA label formats — Standard, Simplified, Micro Side-by-Side, Tabular, Linear V1 / V2, Multi-Column, Dual Column.
- Fully editable vector output, grouped on its own named layer with a white background ready for print.
- Scales and condenses automatically — pick a width and the plugin handles tracking, hierarchy and rule weight to keep the label legible at any size.
- AI Scan reads existing label artwork — vectors, live text, or a placed JPG/PNG inside your document — and fills the panel automatically.
- Bulk data import from Excel, CSV, or a published Google Sheet. Run an entire product catalog through one panel.
You're already a packaging designer working in Illustrator. This manual won't waste your time on what a Nutrition Facts label is — it focuses on getting the most out of the plugin's automation: scanning, importing, switching formats, and generating cleanly at any size.
Installation & Activation.
Install once using ZXP Installer, activate with the license key from your purchase email, and the panel appears in Window → Extensions.
Step 1 — Install the plugin
- Download ZXP Installer (free).
Get it from aescripts.com/learn/zxp-installer and install it on your computer.
- Open ZXP Installer.
Launch the application after installing it.
- Drag the .zxp file onto ZXP Installer.
Drag
NutriFactsMax-v1.4.0-LS.zxp(from your purchase email) directly onto the ZXP Installer window. - Restart Adobe Illustrator.
Fully quit and reopen Illustrator for the extension to register.
- Open the panel.
Go to
Window → Extensions → NutriFacts Max.
Step 2 — Activate your license
- The activation screen appears on first launch.
It will show automatically the first time you open the panel.
- Paste your license key.
It was sent to you in the purchase confirmation email. Whitespace is trimmed automatically.
- Click Activate.
The panel unlocks immediately and you're ready to generate.
Your license can be activated on up to 2 computers. To transfer it to a new machine, email support@ideafactory.digital — we'll deactivate the old one so you can activate the new one.
Panel Overview.
Four sections, always visible in the same order. Top to bottom, the workflow mirrors the way a label gets built: pick a format, set its dimensions, fill in the data, generate. Import / Scan and Settings are collapsible — click their headers to fold them away when you don't need them.
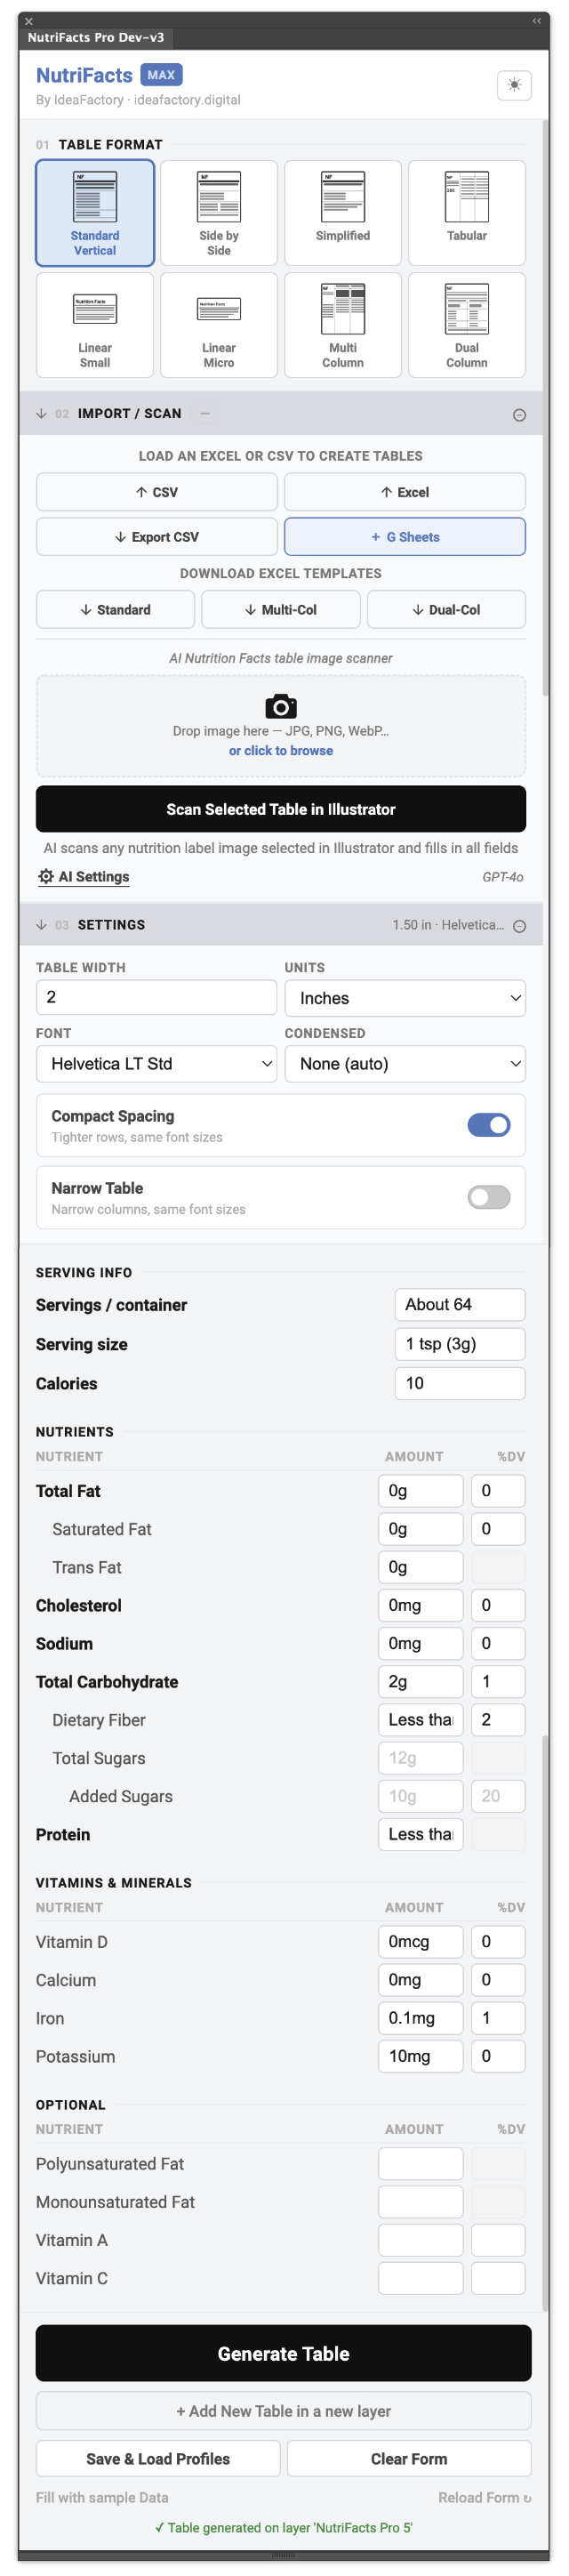
- 1Section 01 · Table FormatPick one of eight FDA-compliant layouts. The selected card highlights to confirm.
- 2Section 02 · Import / ScanBring data in: CSV, Excel, Google Sheets, AI Scan, or scan a selection straight from the artboard. Collapsible.
- 3Section 03 · SettingsWidth, units, font, Compact and Narrow modes. Collapses to free up vertical space once configured.
- 4Serving / Nutrients / VitaminsManual entry fields, organized in the same order as the FDA reference label.
- 5Section 04 · GenerateGenerate Table replaces; Add Table appends. Profiles save your layout setup for reuse.
| Section | What it does |
|---|---|
| 01 · Table Format | Choose which of the 8 FDA formats to generate. |
| 02 · Import / Scan | Pull data from CSV, Excel, Google Sheets, AI scan, or selected artwork. |
| 03 · Settings & Data | Set width, font, modes; enter or review nutrition data. |
| 04 · Generate | Create or append the label in the active document. |
Table Format.
Click any format card. The card highlights to confirm your selection — that format becomes the structure for the data fields below and the artwork that gets generated.
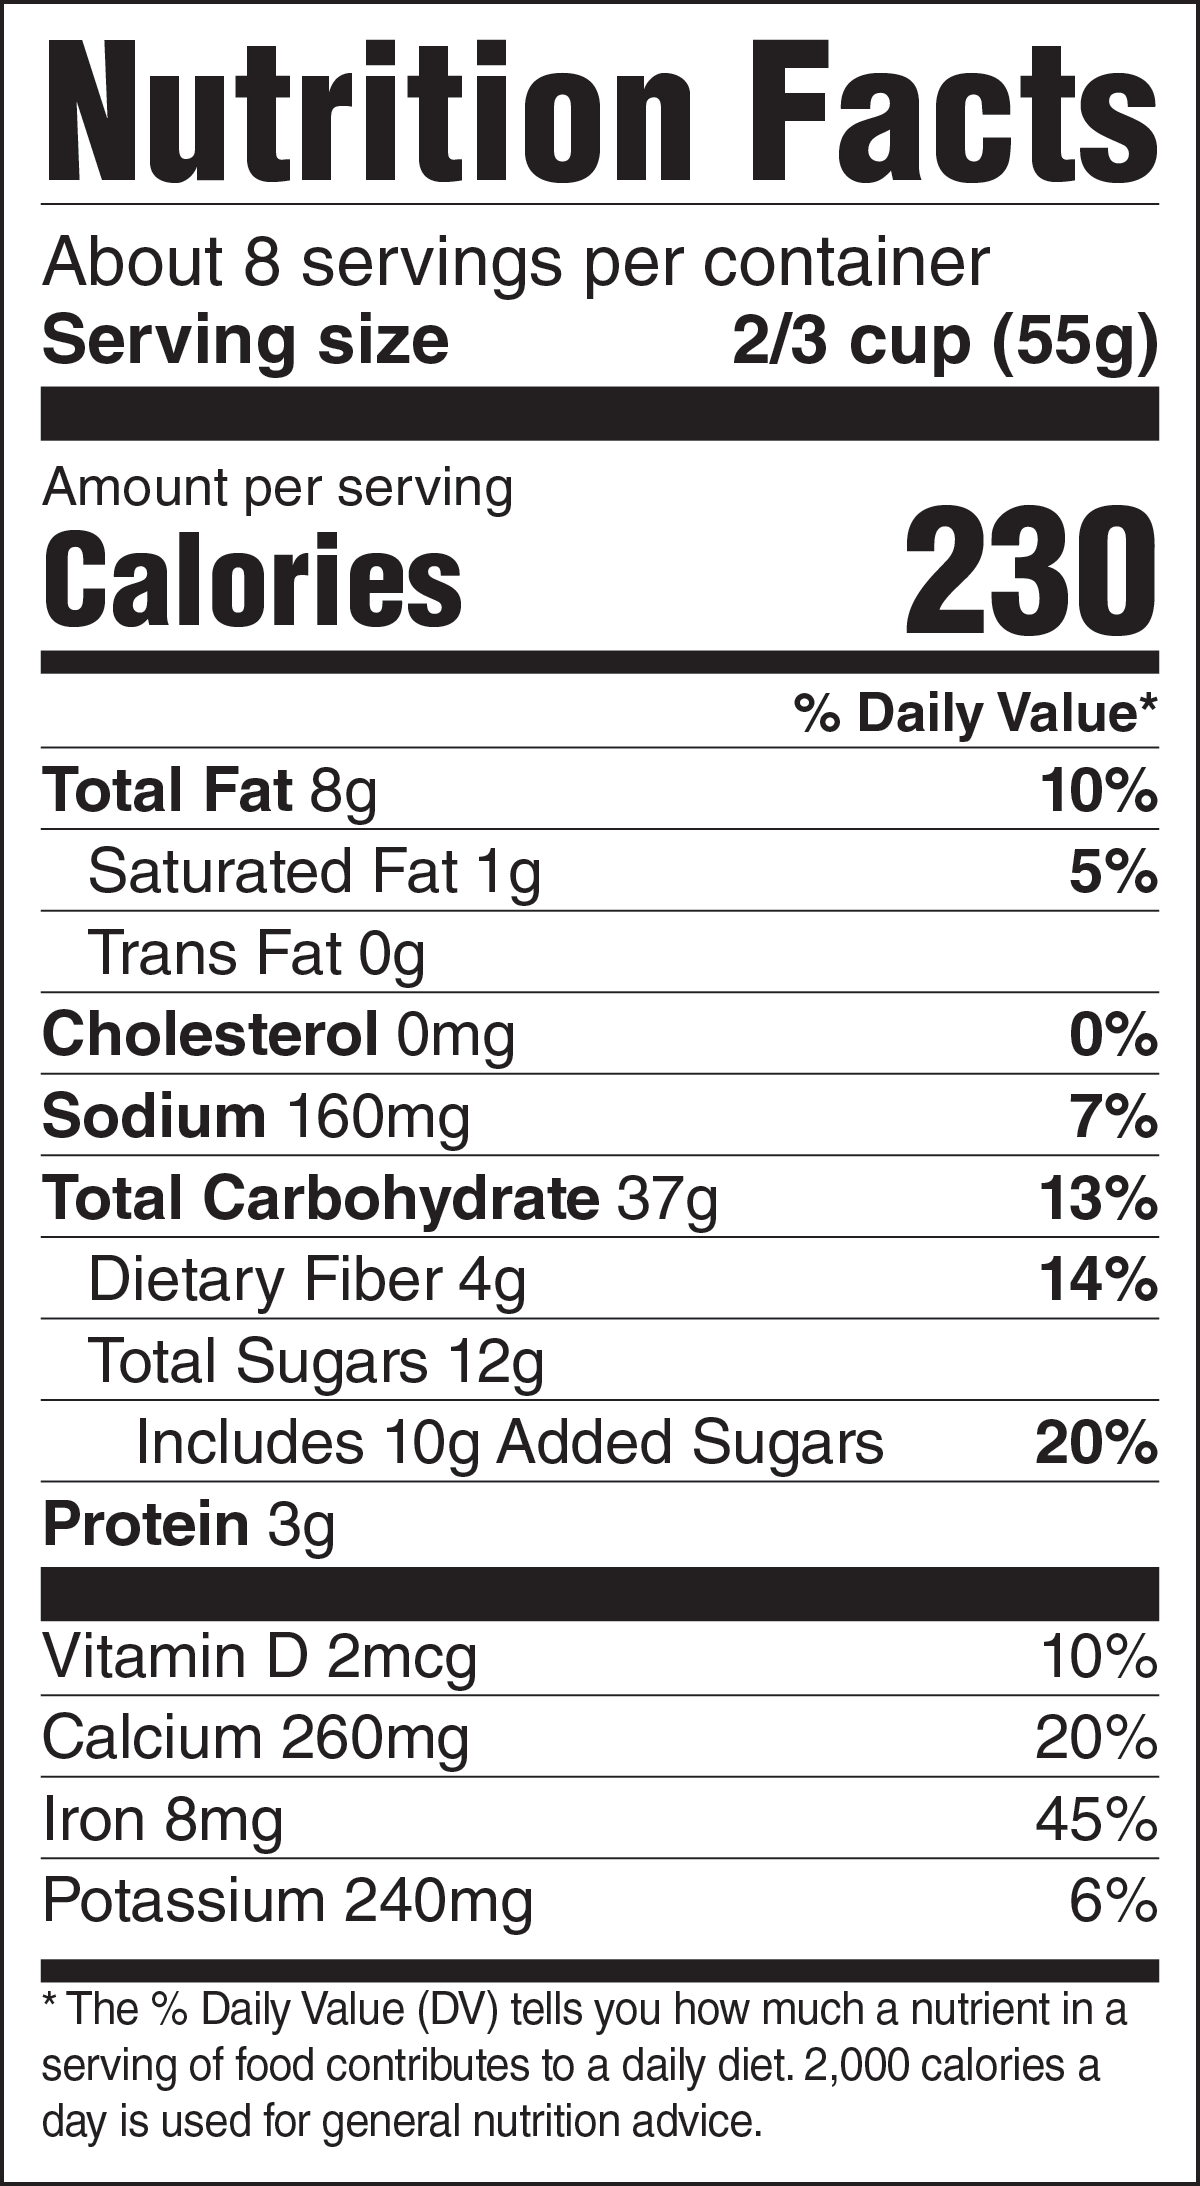
Standard Vertical
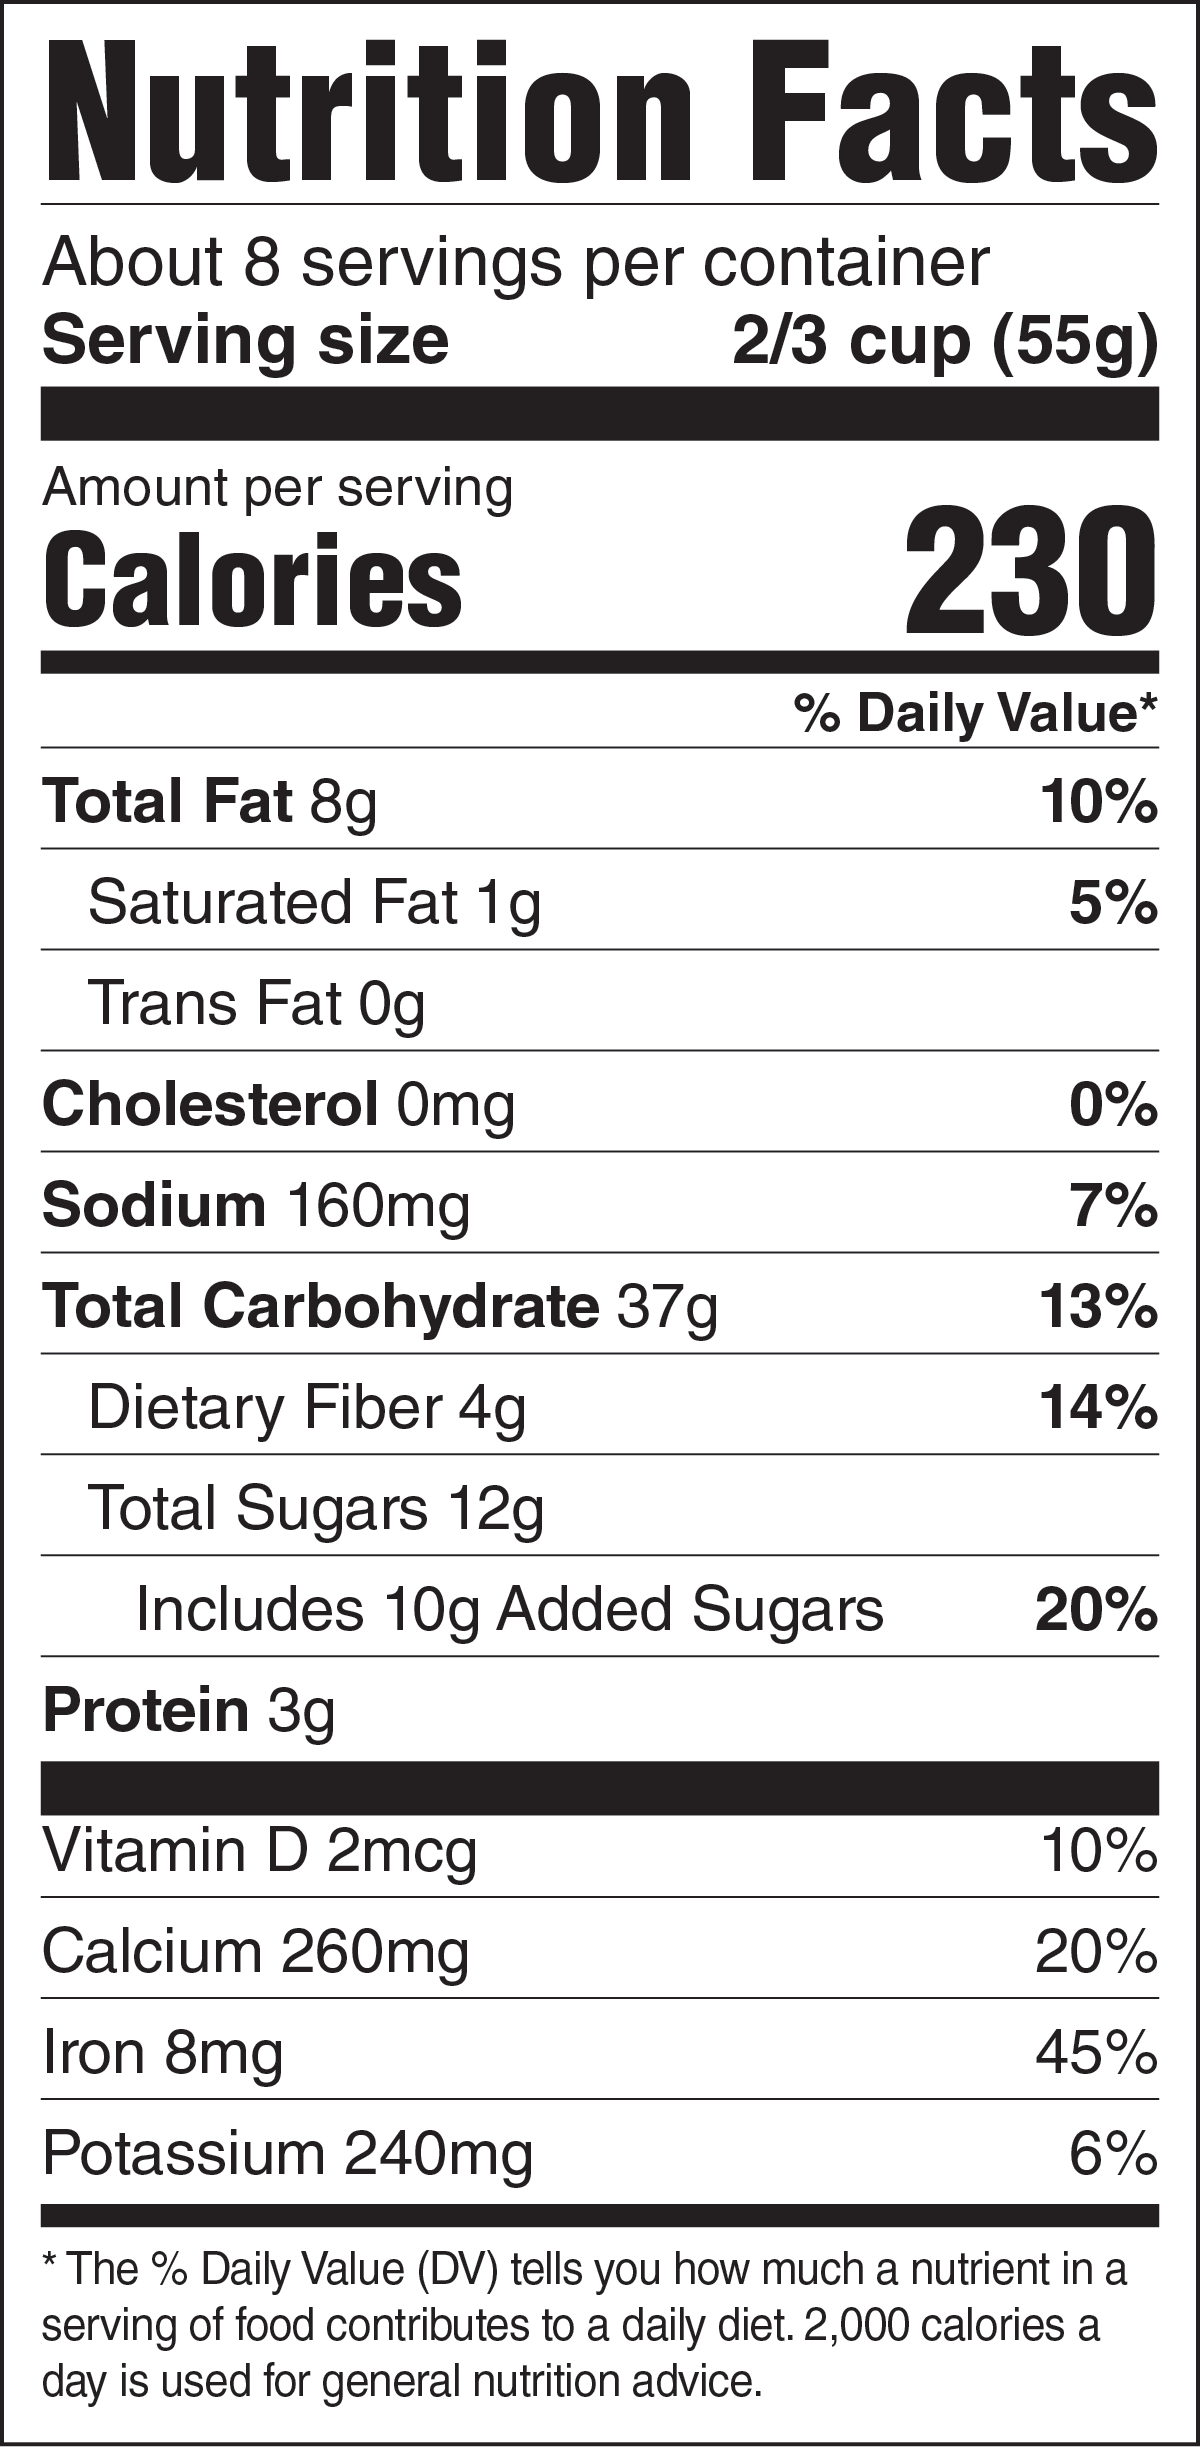
The classic single-column FDA layout. Most products use this when there's enough label space.
Simplified
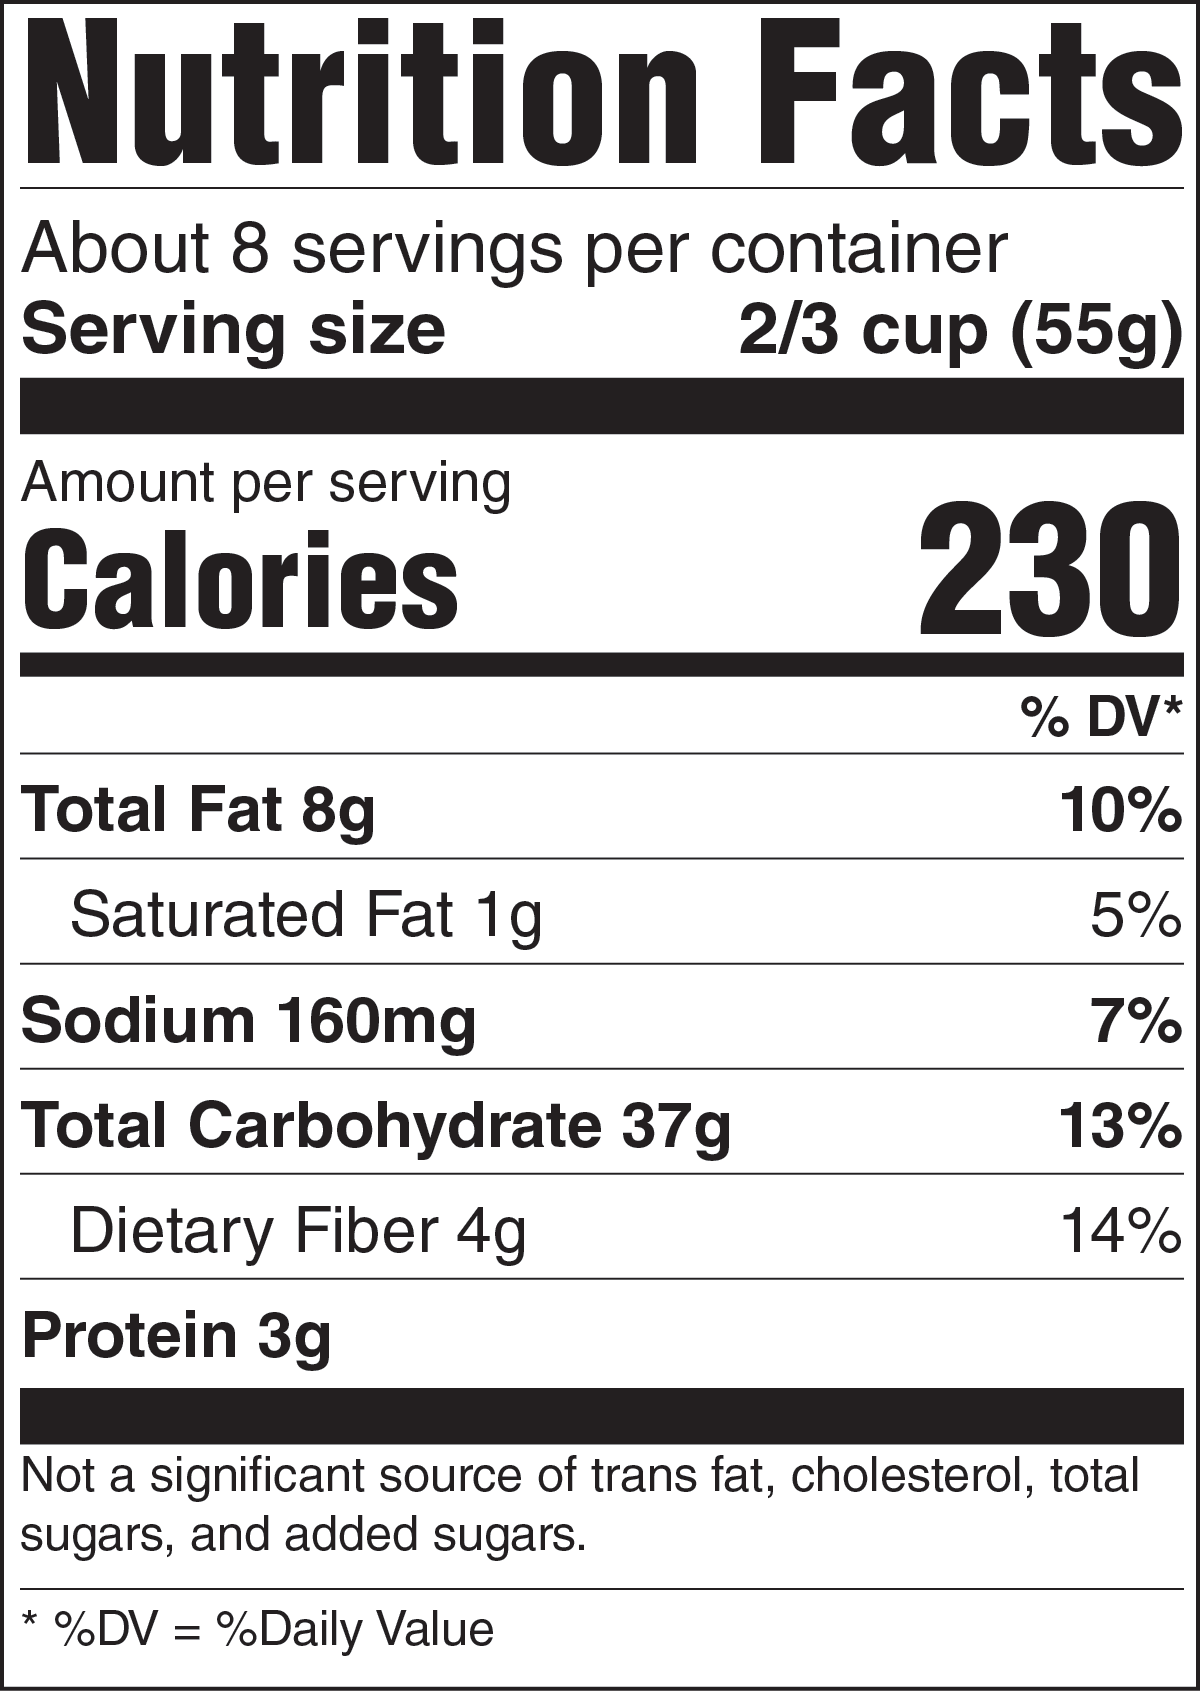
For products with very few reportable nutrients. Cleaner, shorter table.
Micro Side-by-Side
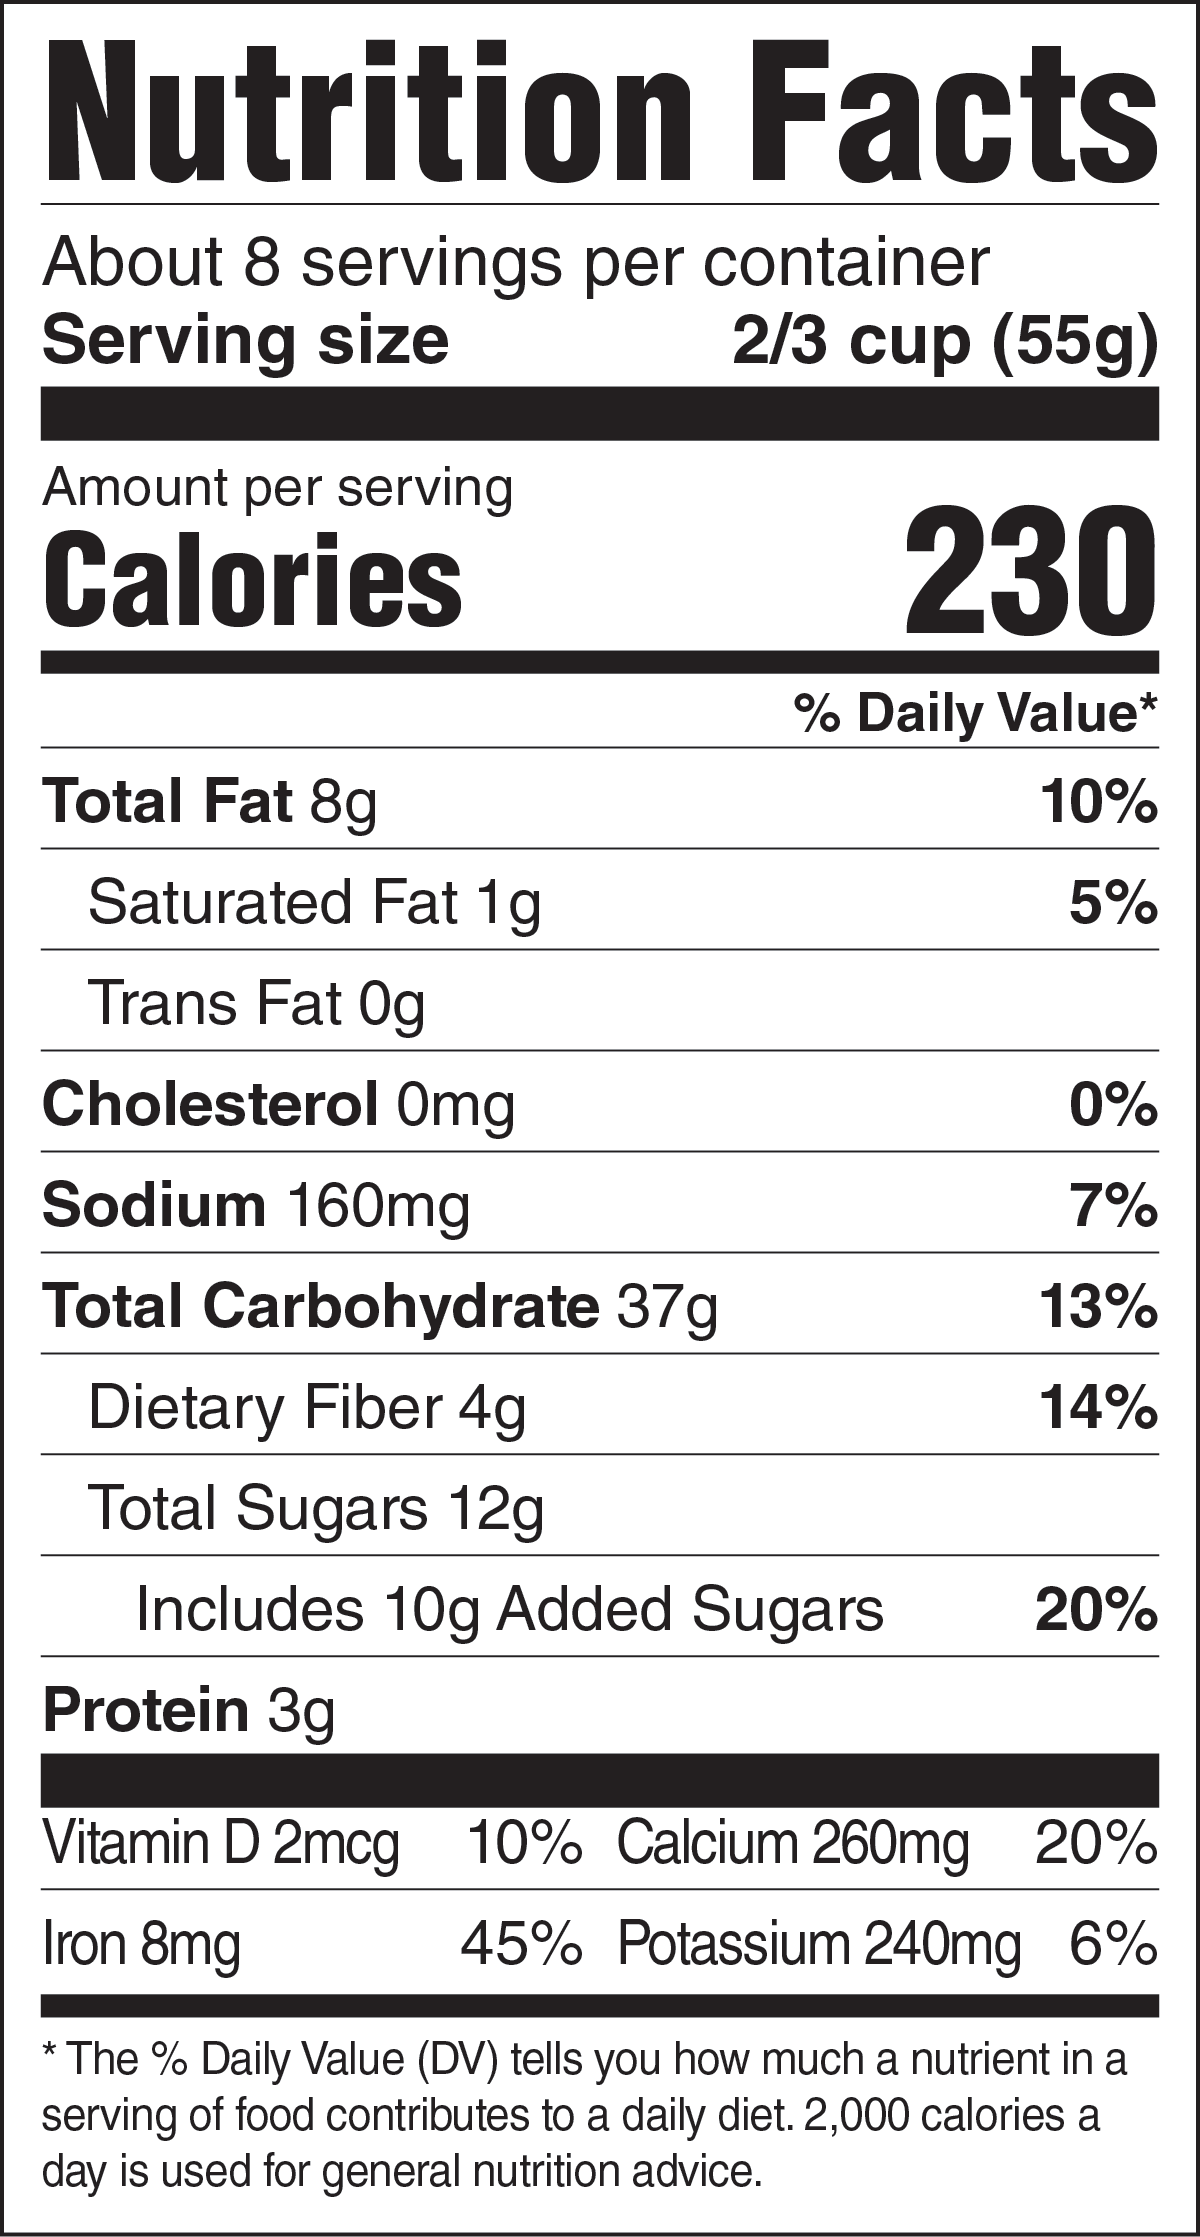
Compact layout where micronutrients display in two columns to save vertical space.
Tabular
Horizontal layout for tall narrow packaging — bars, tubes, stick packs.
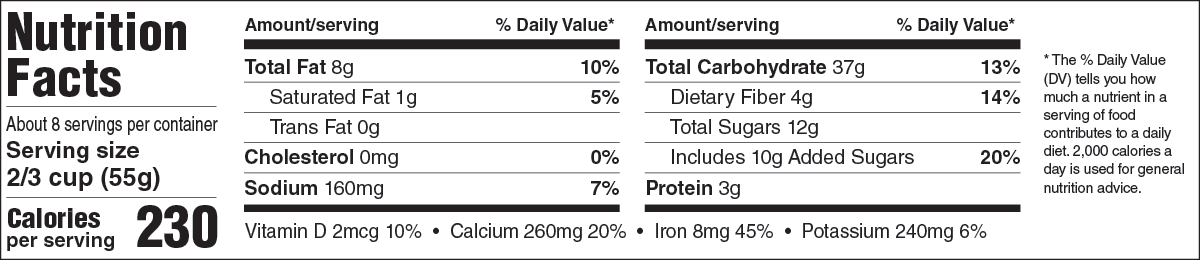
Linear V1
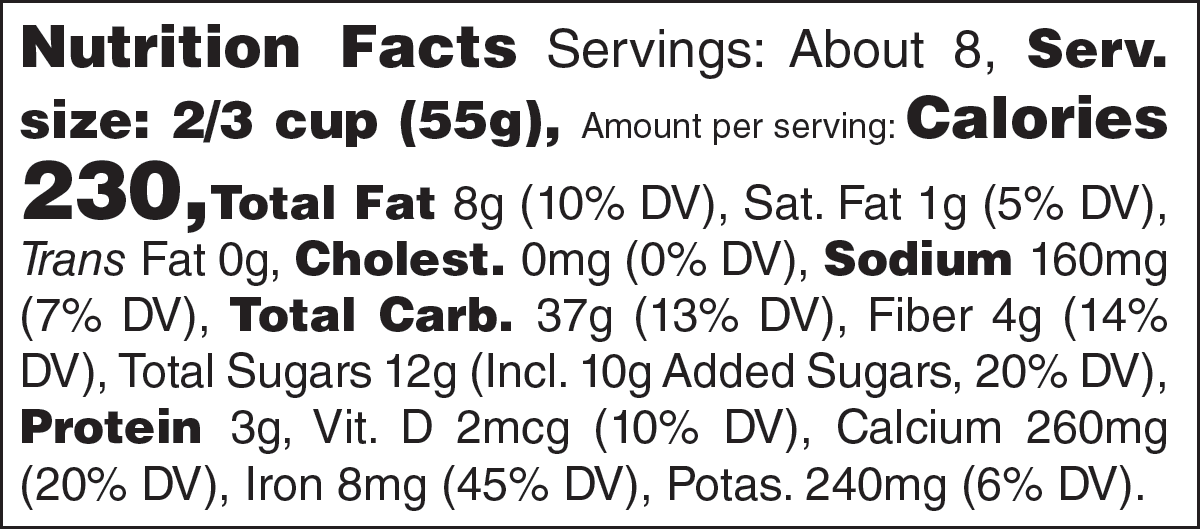
All nutrients in a single line of text. For extremely tight spaces.
Linear V2

Alternate linear format with slightly different inline structure.
Multi-Column
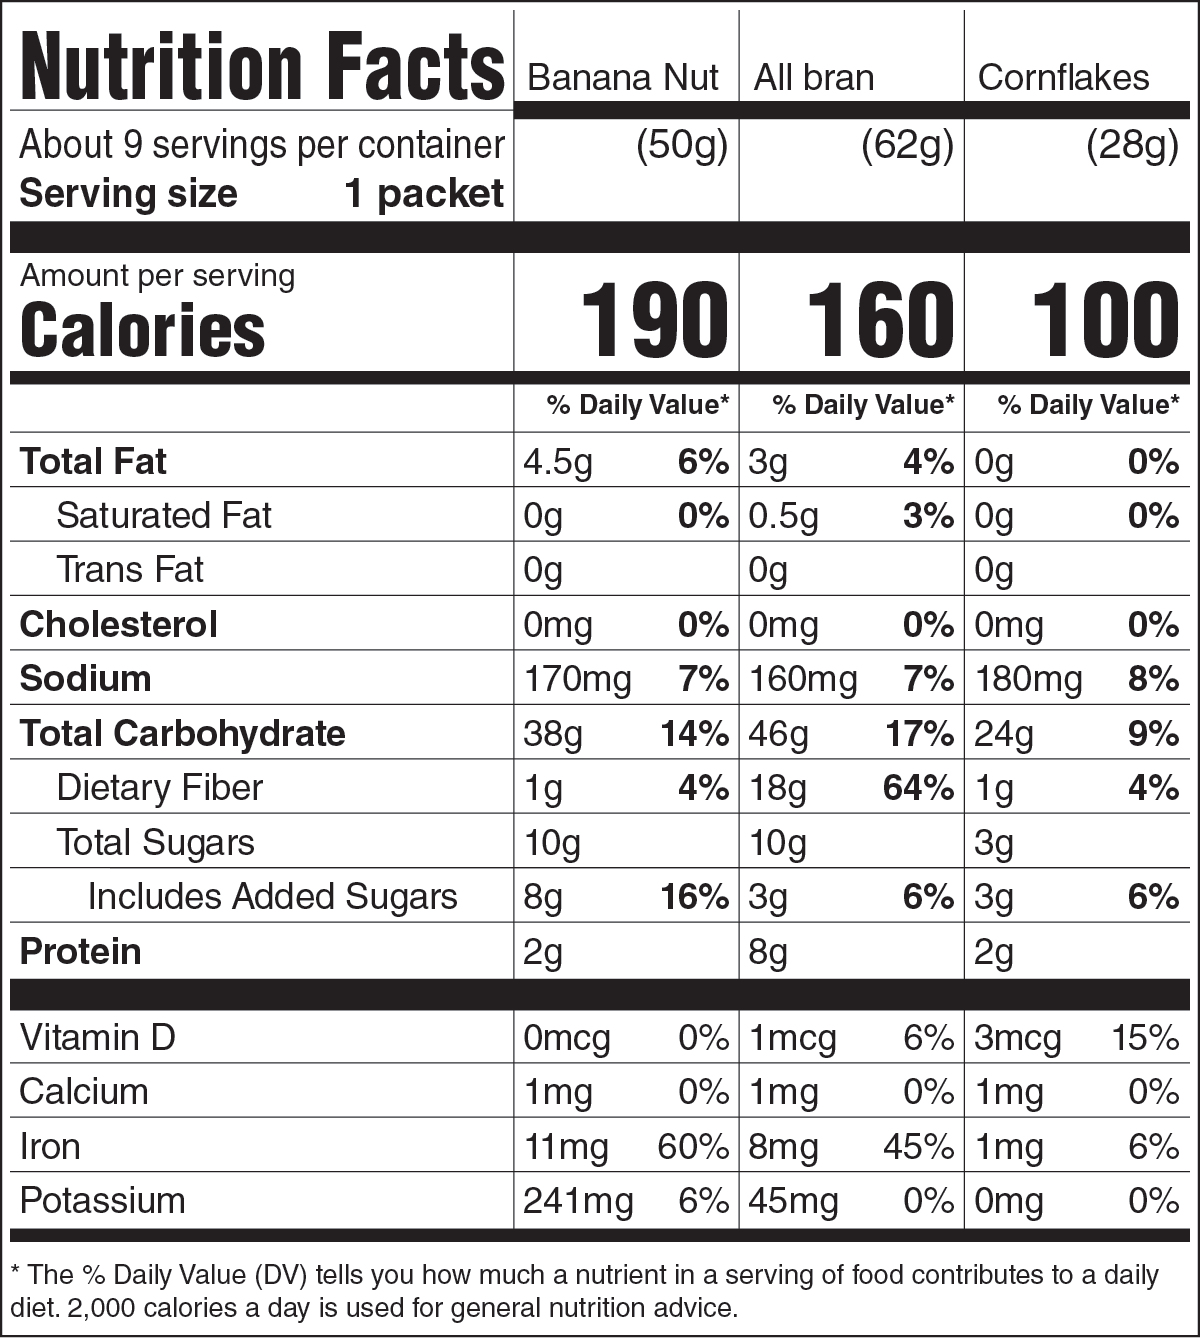
Side-by-side comparison of 2 or 3 product variants sharing a serving size.
Dual Column
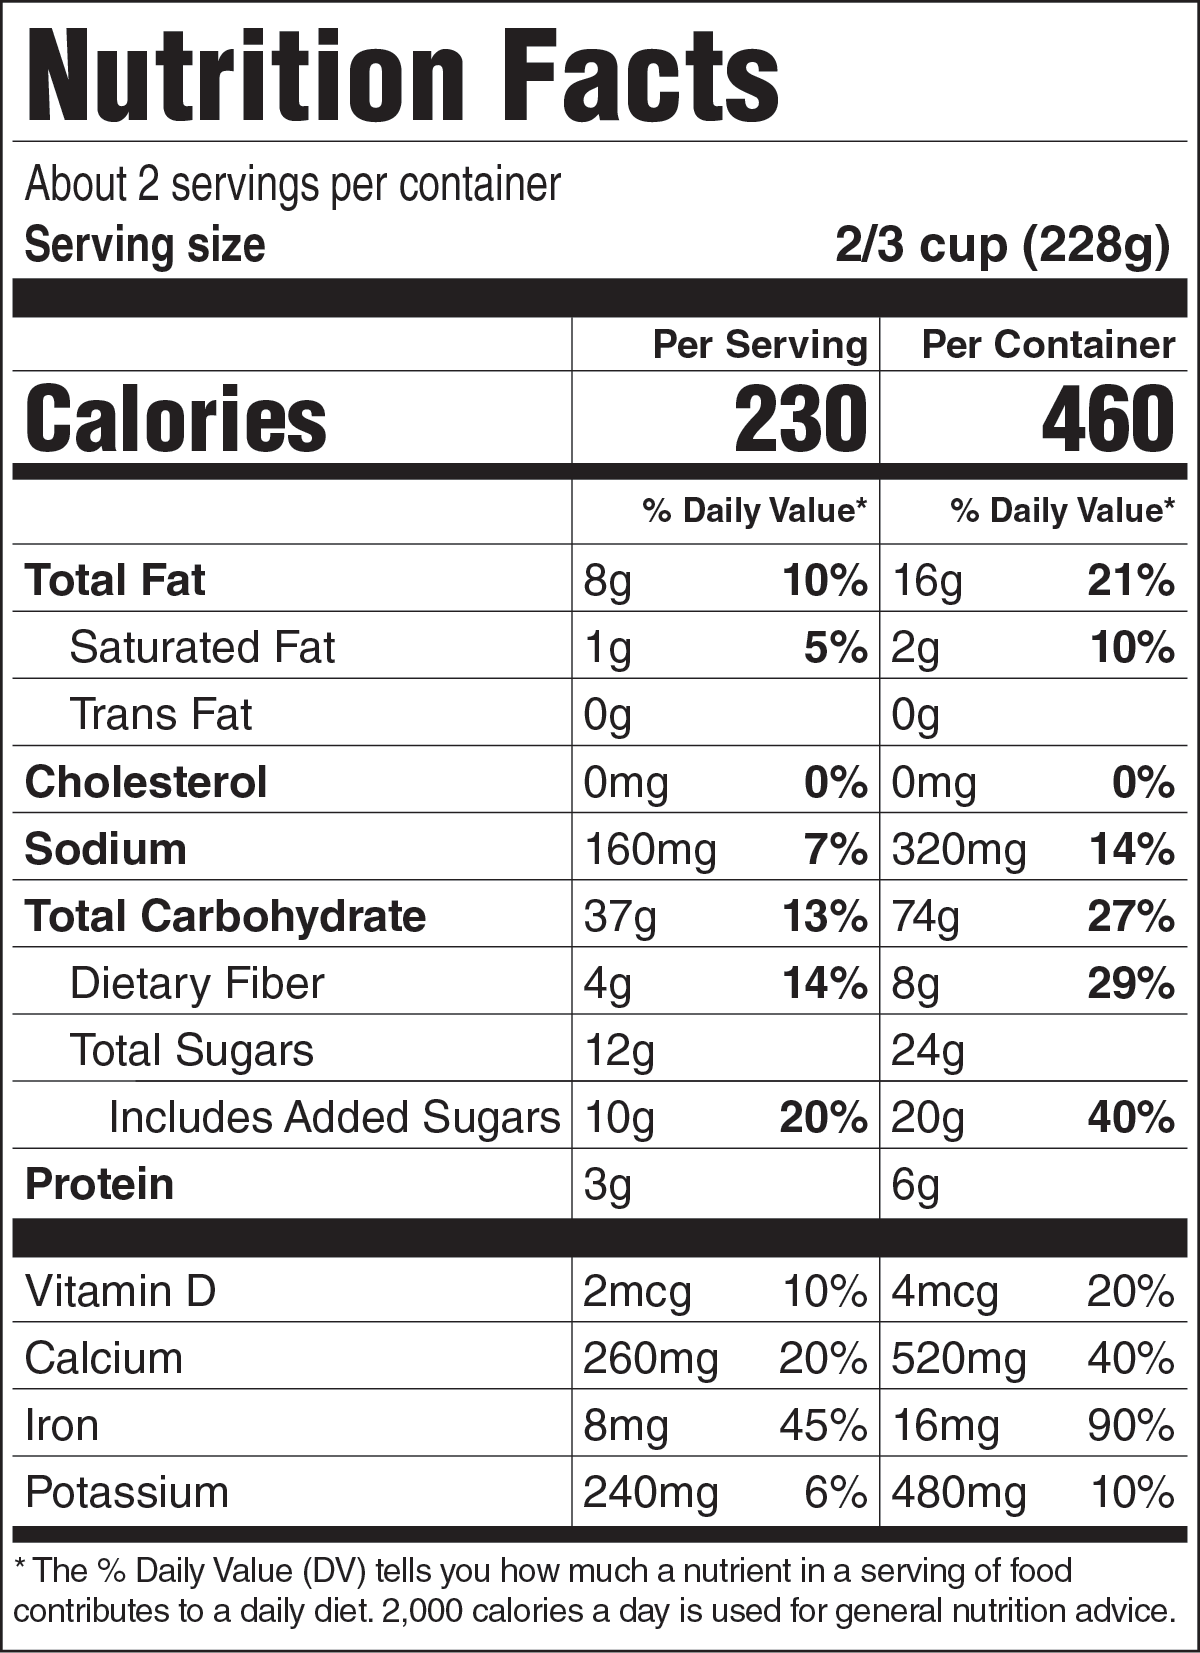
Two columns showing Per Serving and Per Container values simultaneously. Required by FDA for certain package sizes.
The FDA's guidance depends on package size, surface area, and product type. When in doubt, start with Standard Vertical — it's the most common and easiest to swap out later if the regulatory team flags something.
Dimensions & Settings.
Set the size, the typeface, and the two density modes. These five controls do most of the heavy lifting — once they're right for a client, save them as a Profile (see §6.9) and forget about them.
5.1 · Width & Units
Width sets the total horizontal size of the generated label. Enter a number, pick a unit from the dropdown, and that becomes the width of the artwork that lands on your artboard.
Available units
in— inches (most common for US labels)mm— millimeters (international or metric packaging)
Common widths by format
| Format | Typical width |
|---|---|
| Standard Vertical | 2 – 3 in |
| Multi-Column · 2 col | 2.75 in |
| Multi-Column · 3 col | 3.5 in |
| Dual Column | 3 in |
| Tabular | 3 – 4 in |
| Linear | 4 – 5 in |
The minimum recommended width for Standard Vertical is 1.5 in (38 mm). Below that, the plugin automatically applies Narrow Mode (see §5.4) so the content stays legible without truncating.
5.2 · Font Selection
The Font dropdown shows every font currently loaded in Illustrator. Click the dropdown, start typing to filter, pick your typeface — the label is generated using that family.
The default is Helvetica LT Std — the typeface bundled with Adobe Illustrator at install time, so it's always available on a stock setup. Change it only if your client's brand guidelines require it.
FDA requirements
- The label must use a single, easy-to-read typeface.
- Helvetica and Arial are the most common choices and the safest defaults.
- The plugin handles Bold, Regular and Italic weights automatically — you only need to pick the base family.
If your selected font is unavailable when generating, the plugin falls back to Helvetica LT Std — Illustrator's default install font — and from there to Helvetica → Arial. The label still generates, but check it before sending to print.
5.3 & 5.4 · Density modes
Two independent toggles control how tightly the label is packed. Use the tabs below to compare against a default-spacing label of the same data.

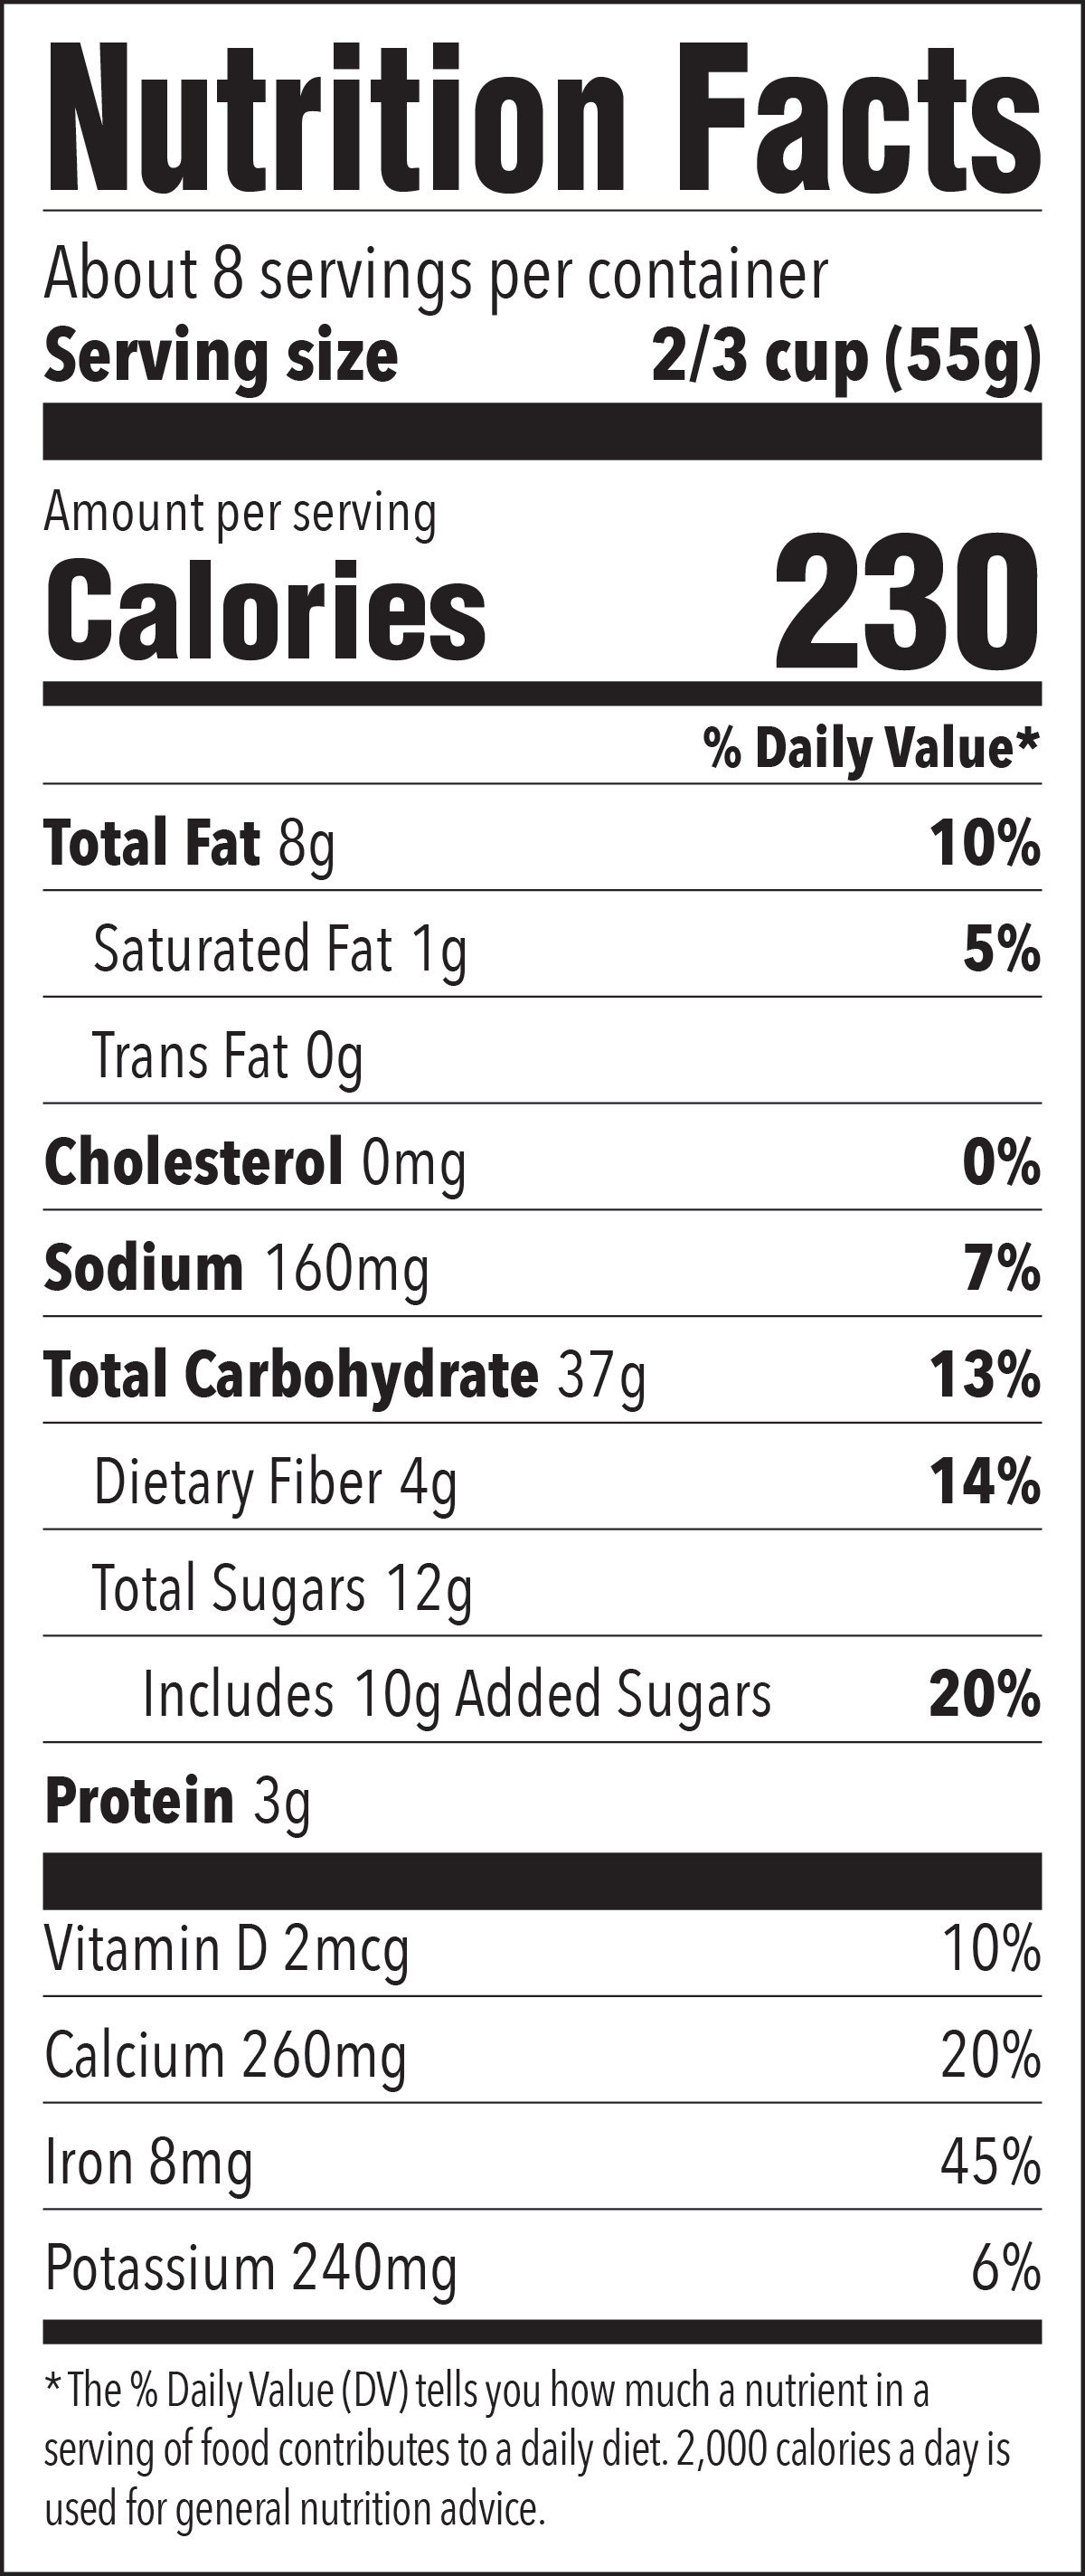
Default spacing
Both density modes off — full FDA spacing tolerances applied. Use this when you have the room.
Dimensions: 2 × 4.4 in
Compact Mode · ON
Reduces vertical spacing between nutrient rows. Type sizes and rule weights are preserved — the table is just shorter.
Use it when: the standard table runs taller than your label area allows. Compliant within FDA tolerances.
Dimensions: 2 × 3.8 in
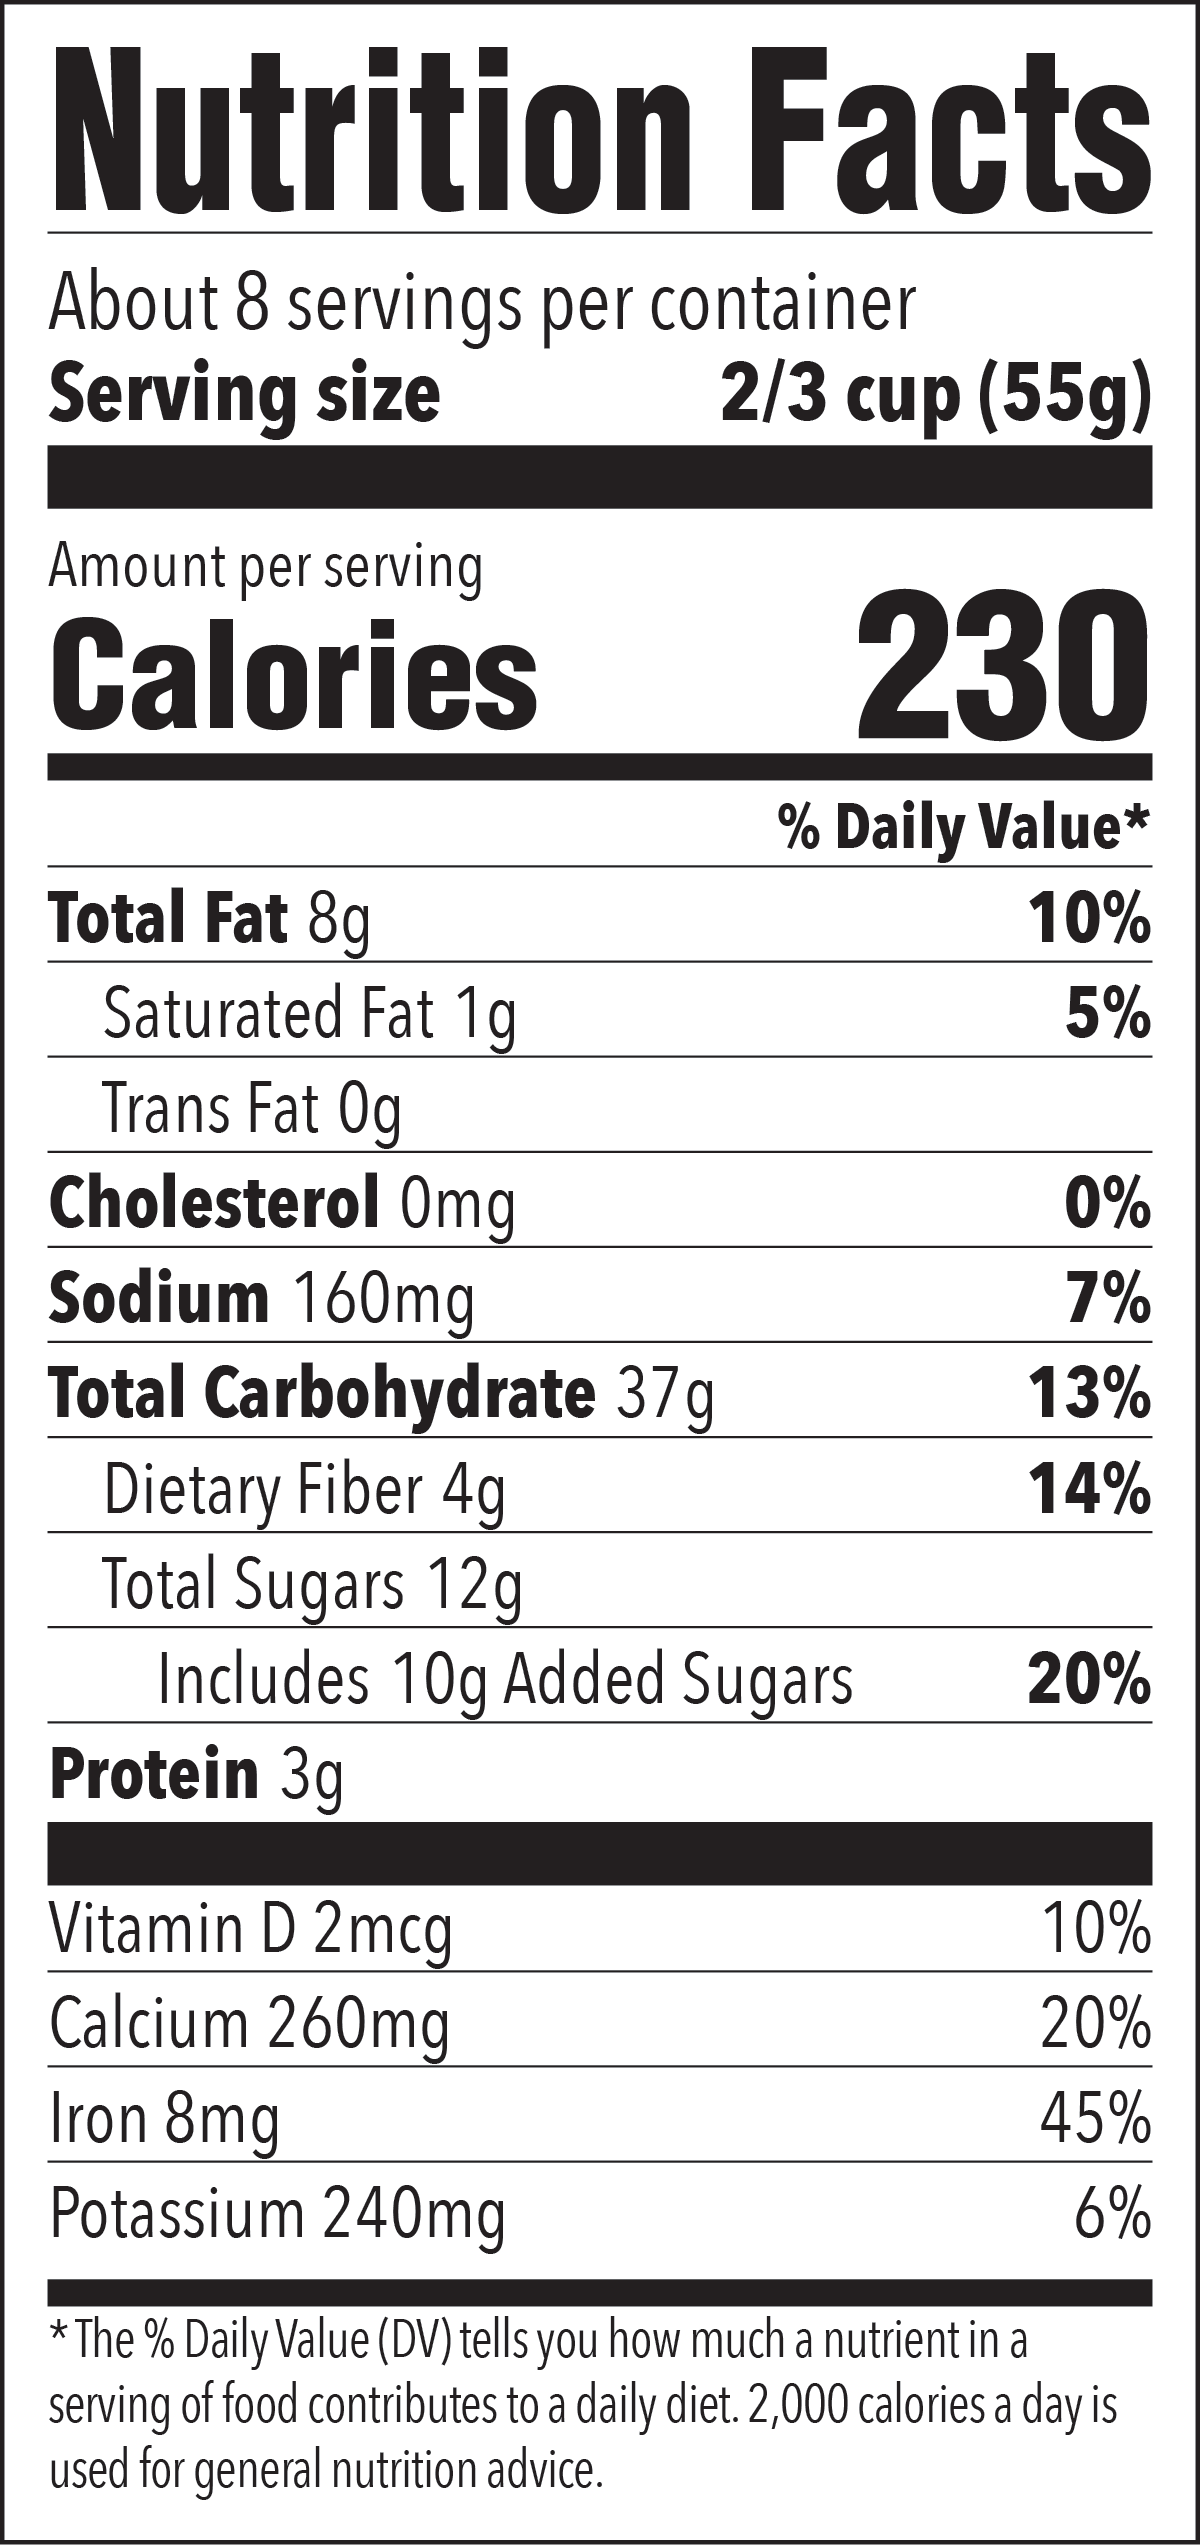
Narrow Mode · ON
Tightens character tracking and applies a subtle horizontal scale to the type. Width is preserved while every nutrient stays visible.
Activates automatically when width ≤ 2 in (144 pt). Designed for tight packaging — avoid forcing it on at standard sizes.
Dimensions: 1.8 × 4.4 in
Both modes · ON
Combine when you're working at extreme widths — single-serve sachets, stick packs, sample tubes. The label compresses on both axes.
Always proof at print size. What's legible on screen at 200% may not survive a flexo press.
Dimensions: 1.8 × 3.8 in
5.5 · Clear Form
The Clear button resets all data fields in the current form to empty. Format, width, unit, and font settings are preserved — only the nutrition data is cleared. Use it when starting a new product from scratch under the same client's setup.
Data.
Six ways to get nutrition data into the panel. Type it, scan it, drop a file on it, fetch it from a Google Sheet, or restore it from a profile. The fastest path depends on what your client already has.
| If your data lives in… | Use… |
|---|---|
| A printed label or competitor packaging | AI Scan (image drop or selection) |
| The artwork you already have on the artboard | AI Scan → Scan Selected |
| A spreadsheet from the food scientist | Excel Import (single or multi-product) |
| A live document the client keeps updating | Google Sheets (publish to web) |
| Your own previous job, archived as data | CSV Import / Profiles / Catalog |
| Nothing — fresh entry from a lab report | Manual entry |
6.1 · Entering Data Manually
Fill in each field directly in the panel. Fields are grouped to follow the FDA reference label order, top to bottom.
Standard / Simplified / Micro / Tabular / Linear
- Serving Size.
Free text — for example,
1 cup (240mL). - Servings Per Container.
Numeric or descriptive —
About 4. - Calories.
Whole number, no unit.
- Each nutrient — amount + %DV.
Amount fields take the unit (
12g,370mg); %DV fields are numbers only. - Optional nutrients.
Vitamin A, Vitamin C, Polyunsaturated Fat, Monounsaturated Fat — leave blank if not on your label.
Multi-Column
- Shared values at the top.
Serving Size and Servings Per Container apply across every column.
- Pick column count.
2 columns or 3 columns.
- Fill each column tab.
Each tab carries its own product Name, Calories, and full nutrient list.
Dual Column
- Shared serving information.
One serving size, one servings-per-container value.
- Per Serving column (left).
Standard nutrient values.
- Per Container column (right).
Same nutrients, recomputed for the whole package.
%DV fields accept numbers only — enter 15, never 15%. Amount fields should always include the unit: 12g, 370mg, 2mcg.
6.2 · AI Scan
AI Scan reads an image of an existing Nutrition Facts label and fills the entire panel automatically — including detecting which of the 8 formats it is and switching the panel to match.
One-time setup
- Open AI Settings.
Click the
⚙icon in the AI Scan section. - Pick a provider.
Claude (Anthropic) or OpenAI. Both work — pick the API your studio already pays for.
- Paste your API key.
Stored locally on your machine — it never leaves the plugin.
- Test & Save.
The Test button verifies the connection. Save to keep the key for future sessions.
Three ways to scan
Method 1 · Drag & Drop
Drag a JPG, PNG, or WebP image of the label directly onto the scan zone. The AI analyzes it, fields populate, and the format auto-switches if it differs from your current selection.
Method 2 · Browse
Click the scan zone to open a file picker. Same supported formats. Useful when the file is buried in a client's shared drive and dragging is awkward.
Method 3 · Scan from Illustrator selection
This is the workflow most designers underuse. Select any Nutrition Facts artwork on your artboard — placed JPG or PNG, vector group, or live editable text — and click Scan Selected in Illustrator. The plugin exports the selection, sends it to the AI, and fills the panel.
You inherit a legacy file with a hand-built label and need to regenerate it as a clean editable group. Select the old label, scan it, hit Generate. The new artwork lands on a fresh layer, ready to replace the original.
| Supported | Not supported |
|---|---|
JPG · PNG · WebP | TIFF · PDF · SVG |
Blurry photographs, rotated angles, glare, or partial labels produce inaccurate results. Review every field before generating, especially %DV columns and the serving size string.
6.3 · Import Excel
Bring data in from a filled .xlsx file. Two layouts are supported, depending on whether you're loading one product or many.
Single product · vertical layout
- Download the template.
Pick the right one for your format — Standard, Multi-Col, or Dual-Col (see §6.7).
- Fill in your data.
Replace the sample values. Don't rename the field column — the plugin reads keys, not labels.
- Click ↑ Excel and select your file.
The panel populates automatically.
Multiple products · horizontal "Products" sheet
- Use a sheet named
Products.Row 1 = column headers (field keys), each subsequent row = one product.
- Click ↑ Excel.
The plugin scans the workbook and finds the Products sheet automatically.
- Pick a product.
If multiple products are detected, a selector dialog appears. The rest stay in the Catalog (§6.8) for one-click switching.
6.4 · Import CSV
Simpler than Excel — a flat field,value structure. Best for one product per file.
CSV structure
- Two columns:
field,value - One field per row
- Field names match the Excel keys (
serving_size,total_fat,sodium_dv…)
Use Export CSV (§6.6) to get a correctly formatted file from any panel data — then use that file as your CSV template going forward.
6.5 · Google Sheets Import
Pull data from a publicly shared Google Sheets document. Useful when the client keeps updating values and you want the latest pull without re-downloading.
- Publish the sheet.
In Google Sheets:
File → Share → Publish to web— or set sharing to Anyone with the link can view. - Copy the URL.
Either the publish-to-web URL or the regular share link.
- Paste & Fetch.
In the panel, click G Sheets, paste the URL, click Fetch.
Sheet structure follows the same horizontal "Products" layout as Excel — Row 1 is headers, each subsequent row is one product.
Private sheets cannot be accessed. The plugin doesn't support OAuth — if your client is sensitive about sharing, ask them to publish a read-only copy with the values stripped of formulas.
6.6 · Export CSV
Export the current panel data as a CSV file. Useful for archiving a job, sharing with a copywriter, or seeding a future template.
- Fill in the panel.
Either manually or via any of the import methods above.
- Click ↓ Export CSV.
A Save dialog appears.
- Choose location and filename.
The CSV is written with all current field values — including layout settings (format, width, unit, font, mode toggles) so re-importing it restores everything exactly.
6.7 · Excel Templates
Three pre-formatted templates ship with the plugin, accessible from the Download Excel Templates row in Section 02.
| Template | For | Layout |
|---|---|---|
| ↓ Standard | Standard, Simplified, Micro, Tabular, Linear | Horizontal — Row 1 = field names, Row 2+ = one product per row. |
| ↓ Multi-Col | Multi-Column (2 or 3 columns) | Vertical — Col A = field names, Cols B/C/D = column 1/2/3 values. |
| ↓ Dual-Col | Dual Column | Vertical — Col A = field names, Col B = Per Serving, Col C = Per Container. |
Reading the Multi-Col template
- The header row (
Field / Column 1 / Column 2 / Column 3) is fixed — leave it as-is. mc_servingSizeandmc_servingsPerContainerare shared across columns — fill only Column B.col_name,col_calories,col_total_fat, etc. — fill across all columns.
Reading the Dual-Col template
- Header row:
Field / Per Serving / Per Container. dc_servingSizeanddc_servingsPerContainerare shared — fill only Column B.- All other fields fill across both columns.
6.8 · Catalog
The Catalog is automatic — it stores every product from your last imported Excel or CSV file so you can switch between them without re-importing.
- Import a multi-product file.
Excel with a
Productssheet, or a CSV with multiple rows. - The Catalog section appears.
It shows the source filename and the product count.
- Pick a product from the dropdown.
The panel populates instantly. Generate, then pick the next one — no re-importing.
The Catalog persists across Illustrator sessions. To clear it, click the × next to the filename.
6.9 · Profiles
Profiles save your current layout configuration — format, width, unit, font, Compact, Narrow — under a name. Nutrition data is intentionally excluded.
Saving a profile
- Set up the panel.
Format, width, unit, font, mode toggles — all the layout settings you want bundled.
- Click Profiles → Save.
Name it descriptively: client name, brand, or use case.
Loading a profile
Open Profiles, find the saved entry, click Load. All layout settings update instantly. Nutrition data already in the panel stays untouched.
If a client always uses 2.75″ width, Helvetica Neue, Compact mode on — save it once as "Acme Foods · 2.75in" and load it every time. Combined with the Catalog, you can run a 40-product reissue without ever touching the settings.
Generate.
Two buttons. The first replaces, the second appends. There is no third option — and there's a keyboard shortcut for the one you'll use most.
7.1 · Generate Table
- Confirm format, dimensions, and data.
A quick scan of the panel before clicking saves rework.
- Click Generate Table.
The label is created in your active Illustrator document on a dedicated layer.
- Editable vector output.
The result is a fully editable group with a white background, on a layer named
NutriFacts.
If a label was previously generated, it is replaced automatically. To keep multiple labels on the same artboard, use Add Table instead.
7.2 · Add Table
Add Table creates a new label instance without replacing the existing one. Use it for cross-pack comparisons, sample sheets, or when you're showing a client multiple SKUs side by side on the same artboard.
- Set up data and settings.
For each SKU in the catalog or each manually-entered set.
- Click Add Table.
The new label appears alongside the existing one, slightly offset.
- Position as needed.
Each label is a self-contained group; move them freely.
7.3 · Keyboard Shortcut
Triggers Generate Table from anywhere in the panel. Doesn't fire while a modal is open or while a generation is already in progress.
The 8 Label Formats.
Each format is FDA-defined. The plugin produces all eight at any width or font. This chapter is a reference spread — minimum widths, when to reach for each, and any format-specific fields to watch for.
FMT 01 · Standard Vertical
Use case. Default choice for any product with adequate label real estate. Single column, full nutrient list.
Minimum width. 1.5 in (38 mm) before auto-Narrow kicks in.
Watch for. Optional fields (Vit A, Vit C, Poly Fat, Mono Fat) — leave empty to omit, or fill in if your formulation requires reporting.
FMT 02 · Simplified
Use case. Products where most reportable nutrients are present at insignificant amounts. Cleaner, shorter table.
Minimum width. 1.5 in.
Watch for. The "Not a significant source of…" footnote is required and added automatically by the plugin based on which fields you leave blank.
FMT 03 · Micro Side-by-Side
Use case. Saves vertical space by running micronutrients in two columns. Useful for medium-height packages where standard vertical runs too tall.
Minimum width. 2 in.
FMT 04 · Tabular
Use case. Tall narrow packaging — protein bars, sticks, tubes. Reads horizontally to fit the long axis of the package.
Minimum width. 3 in.
FMT 05 / 06 · Linear V1 & V2
Use case. Last resort for extreme space constraints — single-line summary running across the bottom of a small package.
Minimum width. 4 in.
V1 vs V2. Identical content, slightly different inline punctuation and bolding rules. Pick whichever your client's brand standard prefers.
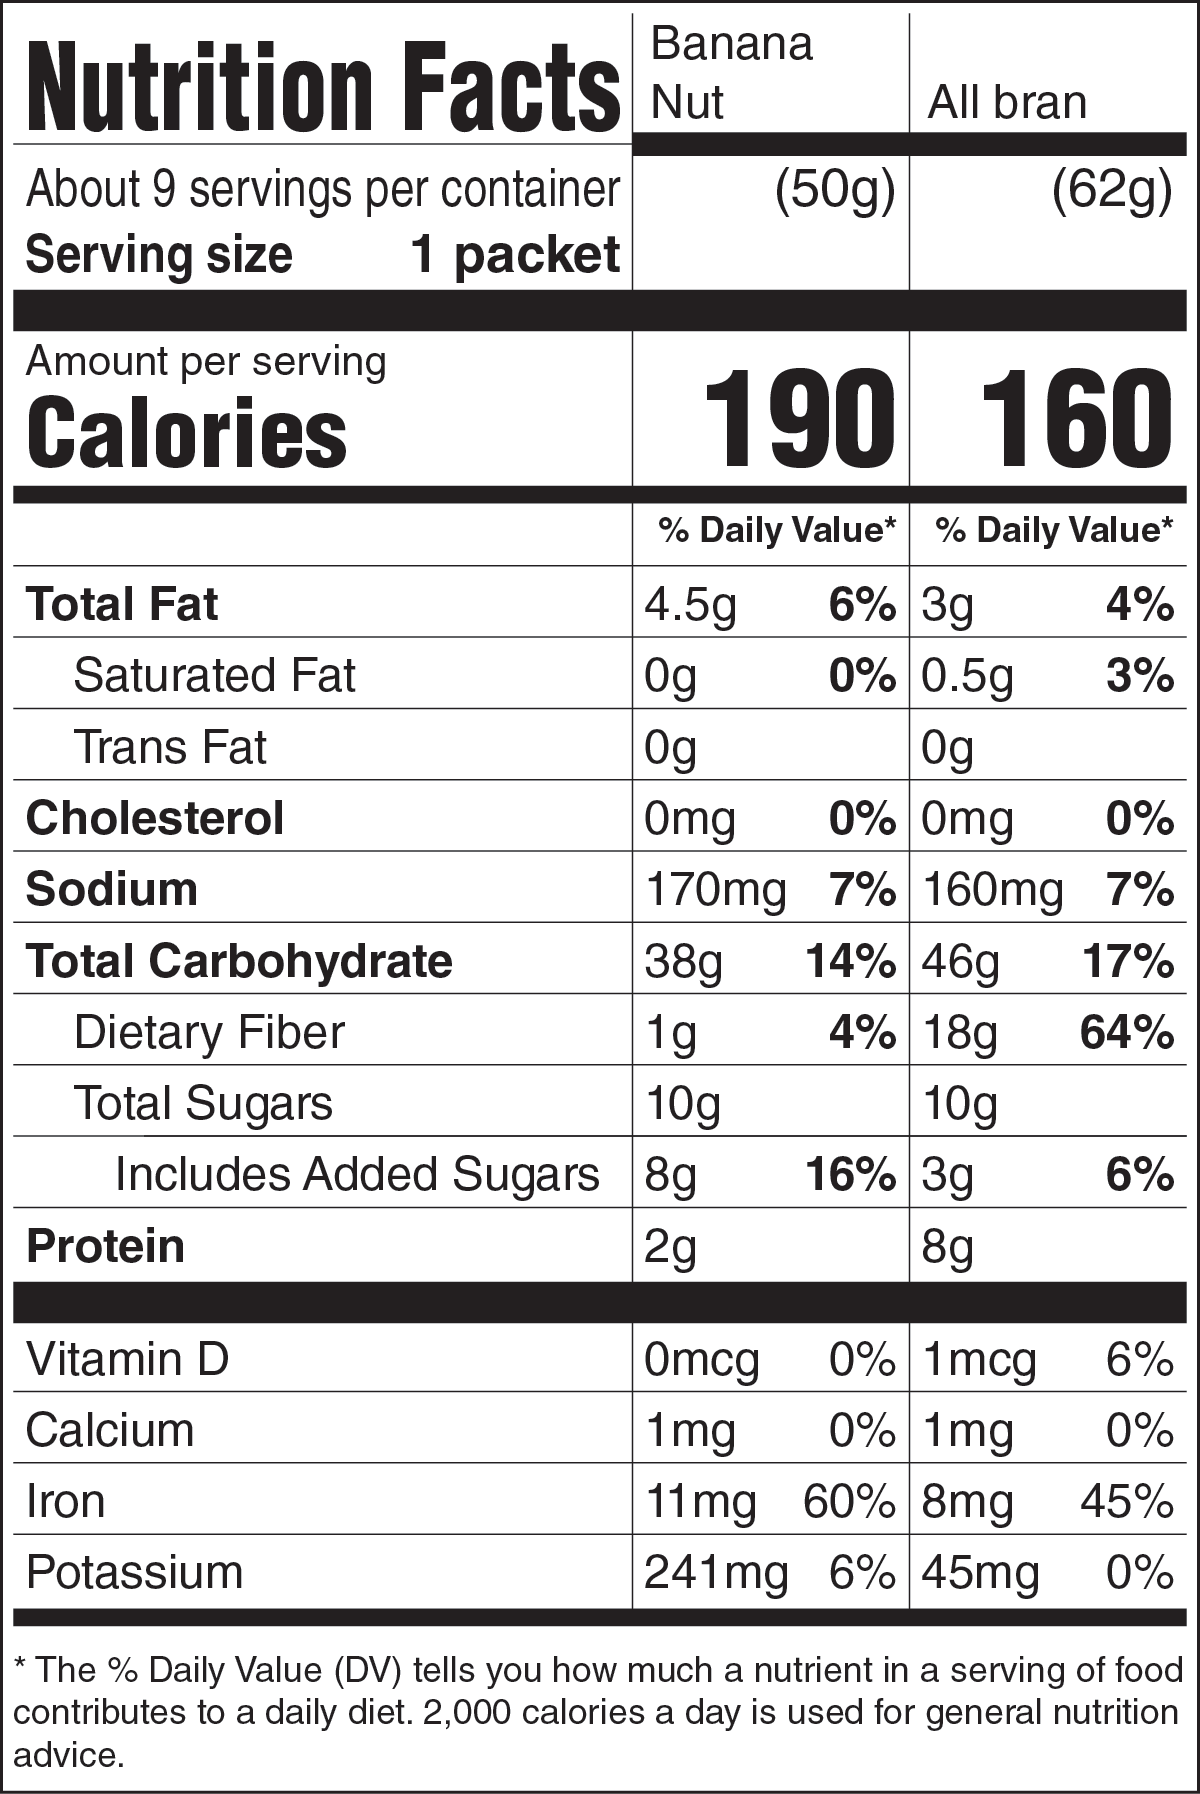
FMT 07 · Multi-Column
Use case. Side-by-side comparison of 2 or 3 product variants or flavors that share a serving size — assortment packs, multi-flavor cartons.
Minimum width. 2.75 in (2-col) · 3.5 in (3-col).
Format-specific fields. col_name per column for the variant label. mc_servingSize and mc_servingsPerContainer are shared.
FMT 08 · Dual Column
Use case. Required by the FDA for packages that contain between 1 and 2 servings but are reasonably consumed in one sitting — pints of ice cream, large beverages.
Minimum width. 3 in.
Format-specific fields. Each nutrient has two values — Per Serving and Per Container — entered side by side in the panel.
Troubleshooting.
The short list of things that go wrong in the field. If you hit something not covered here, email support@ideafactory.digital with a screenshot and we'll help you out.
The panel shows a black screen
PlayerDebugMode is not set. Run the installer script again, or contact support — this is a one-flag fix on the system side.
"No document open" error
Make sure at least one Illustrator document is open before clicking Generate. The plugin needs an active artboard to write to.
The generated label looks different from the preview
The selected font wasn't installed at generate time. The plugin fell back to Helvetica LT Std — the default typeface installed by Adobe Illustrator at install time, so it's always available. Install the desired font and regenerate, or pick a font that's already loaded in your system.
AI Scan isn't filling all fields
The image may be low resolution, partially cropped, or photographed at an angle. Use a clear, full-label image — flat, well-lit, square to the camera. Review and fill in missing fields manually before generating.
Excel import shows "No product data found"
Check that your sheet is named Products (for the horizontal multi-product layout) or that field names in Column A match the expected keys. Download a fresh template from §6.7 and compare side by side — typically a renamed column or a typo'd key is the culprit.
The label is too tall / too short
Three controls, in this order:
- Table Width (Settings → Table width). The first lever — change the width to whatever your layout actually needs. Stay within reasonable, generatable values; pushing well below 1.5 in tends to distort proportions, but the output can always be edited manually if a tighter fit is required.
- Compact Mode. Trims vertical spacing between nutrient rows. Type sizes and rule weights are preserved.
- Narrow Mode. Condenses the entire table to roughly 85% of its normal width (a 15% horizontal compression) while keeping every nutrient legible.
For very tight height constraints, switch format instead — Linear and Tabular were designed for exactly that.
Quick Reference.
Everything you'll reach for daily — shortcuts, units, field keys.
Keyboard Shortcuts
Unit Conversions
Field Key Cheat Sheet
8g with unit%